Suzanne Hollander, MS, RD.

Suzanne Hollander, MS, RD

As a dietitian, home cook, and enthusiast of all-things-delicious, I'm often asked, "so what do YOU eat?" Here's a blog to answer that very question! My hope is that you'll find (even just a little) inspiration from some of my favorite recipes, restaurants, party-ideas and food musings for your own happy, healthy, food-loving lifestyle.

Thursday, January 2, 2014

Sesame Quinoa and Kale

Served alongside homemade coconut shrimp
with sweet and spicy jalapeno sauce
New Year's resolutions abound! Did you decide to be healthier in 2014? Meals with plenty of fresh, seasonal vegetables, whole grains, and healthy (plant-based) fats fill you up and keep you healthy. This Sesame Quinoa and Kale has the added bonus of cooking up in less than 20 minutes (including the prep!), so you'll be on your way to a nutritious weeknight meal. I used a few pantry/refrigerator staples: coconut water, tahini, toasted sesame oil, and spices which add tons of flavor, so you can keep the added salt to a minimum. 

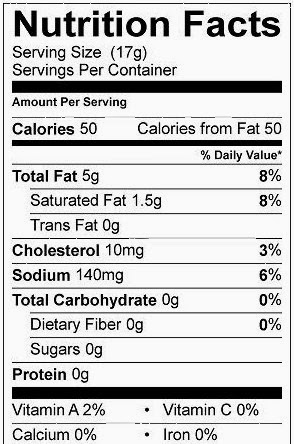
The Nutrition Rundown: Think you can't get enough protein on a plant-based diet? Think again! A side-serving of this dish has as much protein as a whole egg. It's also packed with numerous vitamins, including vitamin K, which is critical for blood and bone health. 


Sesame Quinoa and Kale
Serves 4-6
Based on 6 side-dish servings
Ingredients
1 Tbs olive oil
1 cup uncooked quinoa, rinsed and drained
4 cloves garlic, chopped
1/2 onion, small diced
1 Tbs curry powder
2 tsp cumin
salt and freshly ground black pepper
2 cups coconut water
1 bunch kale, stems removed and torn into 2" pieces
2 Tbs tahini
1 Tbs toasted sesame oil
Juice of 1 lemon 

Directions
  1. In medium saucepan, heat olive oil over medium-high heat. Add quinoa, garlic, onion, and spices, stir to combine and continue stirring frequently while quinoa toasts and onion becomes translucent, ~2 minutes. 
  2. Add coconut water and bring to a boil. Reduce heat to simmer, add kale, and cover to cook ~7 minutes, until quinoa is cooked but still intact with a bite.
  3. Stir in tahini, sesame oil, and lemon juice. Serve warm or cover and refrigerate to serve cold as a salad. 

    Tuesday, November 26, 2013

    Mushroom Soup

    Hearty dishes without a lot of added fat and calories are crucial to staying healthy during the holiday season. This Mushroom Soup skips the cream and butter found in many versions, making an excellent appetizer or light meal alongside a whole grain roll and salad. Using a variety of seasonal mushrooms (mushrooms are at their peak season in fall and winter), gives the soup a lot of flavor without extra fat.

    The Nutrition Rundown: Mushrooms are a rare food source of vitamin D, important for our bodies especially in winter months since our body can only make vitamin D when exposed to sunlight. This soup is also naturally low in fat and calories and tasty enough to satisfy that craving for something warm!


    Mushroom Soup
    Serves 6 appetizer portions
    Ingredients
    2 Tbs olive oil
    4 cloves garlic, minced
    1 shallot, diced
    2 pounds mushrooms, cleaned and chopped (a variety like crimini, oyster, shitake tastes delicious!)
    2 Tbs fresh thyme, chopped
    ½ tsp salt
    ½ tsp freshly ground black pepper
    4 cups vegetable broth (low sodium, if available)
    1 bay leaf
    2 parmesan cheese rinds (optional)

    Directions
    1. In large, heavy saucepot, heat oil over medium heat. Add garlic and shallot and cook ~1-2 minutes. Add mushrooms, thyme, salt and pepper. Cook, stirring frequently, ~5 more minutes, until mushrooms and shallot are soft.
    2. Add vegetable broth. Cover and bring to a boil. Once boiling, reduce heat and simmer. Add bay leaf and cheese rinds if using. Simmer uncovered, stirring frequently, until liquid is reduced by ~1/4.
    3.  Turn off heat and remove bay leaf and cheese rinds. Using immersion blender, puree soup. (If you do not have an immersion blender, allow soup to cool completely and puree in blender, in small batches).
    4.  Serve immediately or store, covered, in refrigerator up to 4 days. 

    Sunday, November 24, 2013

    Pumpkin Yogurt Dip

    As you head into the holidays, whip up healthy snacks with seasonal flavors, like Pumpkin Yogurt Dip. This is a delicious snack for kids or adults, and it satisfies a sweet craving without the overindulgence that is all-too-common during the holidays. The quick recipe below allows you to make as much as you need to serve just yourself or a whole group, so just add some sliced apples (or other seasonal fruit) and enjoy!

    The Nutrition Rundown: Protein from Greek yogurt and fiber from pumpkin and apples will keep you full until your next meal.

    Pumpkin Yogurt Dip
    Ingredients
    1 part plain Greek yogurt
    1 part pumpkin puree (fresh or canned)
    Cinnamon, to taste
    Ground cloves, to taste
    Nutmeg, to taste
    Drizzle of honey
    Granny Smith apples, sliced

    Whisk together yogurt, pumpkin, and spices.  Serve immediately, or store covered in the refrigerator up to 1 week. Drizzle honey over the top and slice apples just before serving. 

    Tuesday, October 29, 2013

    Spiced Sunchoke and Root Vegetable Oven Chips

    Autumn and winter are a great time to experiment in the kitchen with root vegetables. These Oven Chips are spicy, satisfying, and savory. They make a perfect football or holiday party appetizer or can be served as a hearty side dish. I used sunchokes, turnips, and parsnips, but go wild and substitute any root vegetables you like!

    The Nutrition Rundown: In addition to having way more flavor than the usual store-bought potato chip, these Oven Chips also have 5 times the fiber to keep you fuller longer as well as more of the antioxidant vitamins A and C.
    Spiced Sunchoke and Root Vegetable Oven Chips
    with Cool Cilantro Dipping Sauce
    Serves 6

    Ingredients
    ~8-10 Jerusalem Artichokes (aka Sunchokes)
    2 large parsnips
    1 large turnip
    1 Tbs olive oil
    2 Tbs toasted sesame oil
    3 Tbs smoked paprika
    2 Tbs ground cumin
    1 Tbs ground coriander
    1-2 tsp cayenne pepper
    1 tsp salt
    2 tsp crushed black pepper

    For sauce
    ¼ cup sour cream
    2 Tbs mayo
    3 Tbs fresh cilantro, chopped
    1 Tbs harissa or hot sauce
    Salt and pepper

    Directions
    1. Preheat oven to 400 degrees.
    2.  Scrub root vegetables (chokes, parsnips, and turnip). Slice thinly along diagonal, making pieces evenly sized as possible. Place sliced vegetables in large bowl, and toss with both oils.
    3. In small bowl, mix together spices. Sprinkle over vegetables, and toss to coat evenly. Spread in single layer on rimmed baking sheets (I used 2 large baking sheets).
    4. Bake in preheated oven until both sides are golden brown, ~45 minutes, turning halfway through cooking.
    5.  While vegetables roast, in small bowl, mix together all ingredients for dipping sauce. Cover and place in refrigerator until ready to serve.
    6. Serve chips warm or room temperature with cool dipping sauce. 

      Nutrition for 1 Serving of Oven Chips
      Nutrition for 1 Serving of Dipping Sauce

    Monday, October 28, 2013

    Fresh Pick of the Week: Jerusalem Artichoke

    Jerusalem artichokes (aka sunchokes) are available at many fall/winter farmers markets throughout the country. These tubers or plant roots grow below sunflower plants and can be prepared similarly to potatoes. However, Jerusalem artichokes offer a sweeter flavor profile than typical potatoes due to the fact that they are composed of a fructose-based carbohydrate known as "inulin". Beyond the benefits from Jerusalem artichokes' vitamins and minerals, the inulin content may confer health benefits of its own. Inulin has been shown to act as a prebiotic, feeding our body's beneficial bacteria, which may result in a stronger digestive tract and immune system. If all of that doesn't give you reason enough to go out and buy them, stay tuned for a tasty recipe later this week!

    Monday, October 21, 2013

    Grilled Caesar Salad

    This summer, some family friends introduced us to this delicious side dish. There is something about preparing vegetables in unorthodox ways that make the usual favorites really shine at the dinner table. Grilled Caesar Salad is quick (and cheap!), which makes it a wonderful weeknight choice or easy, rapid-cook dish at your next dinner party. 

    The Nutrition Rundown: Lettuce is often criticized for having "no nutritional value." Not the case! Romaine lettuce, like many fruits and vegetables, is full of fiber and water, helping to keep you full and hydrate you. One romaine heart also contains ~1/4 of your daily folate needs, particularly important for a healthy pregnancy and/or a healthy heart. 

    Grilled Caesar Salad
    Serves 4

    Ingredients
    Juice of 1 lemon
    3 Tbs olive oil, divided
    Salt and pepper
    2 Romaine hearts, sliced in half lengthwise (keep the bottom end on)
    1 Tbs balsamic vinegar
    1 tsp Dijon mustard
    ¼ cup Tbs freshly grated Parmesan

    Directions
    1. Heat grill to medium-high heat.
    2. In small bowl, whisk together lemon juice, 2 Tbs olive oil, salt and pepper. Brush onto inside portion of romaine hearts.
    3. Place romaine hearts, inside down, on grill. Allow to cook ~3 minutes, until scored. While cooking, whisk together dressing with balsamic, mustard, and remaining olive oil.
    4. Serve salad drizzled with dressing and sprinkled with Parmesan cheese. 

    Saturday, October 12, 2013

    Cauliflower Mash with Leeks & Parmesan

    This Cauliflower Mash has become a comfort food staple at our dinner table. Because cauliflower steams in just minutes (much faster than potatoes), it is a quick, weeknight fix that feels decadent and special. I use leeks for texture and subtle, onion flavor as well as Parmesan, which adds a saltiness and creaminess to the dish. This version was so delicious, it will likely make an appearance on our Thanksgiving menu this year!

    The Nutrition Rundown: In addition to offering fewer calories than standard mashed potatoes, this dish uses leeks, from the "allium" family, and cauliflower, from the "cruciferous" family of vegetables. The combination of nutrients in these vegetable families help reduce your risk of heart disease and cancer. Can't beat something this healthy and delicious!

    Cauliflower Mash with Leeks
    Serves 4

    Ingredients
    2 Tbs Olive oil
    2 leeks, bulb and lower leaf, cleaned well, sliced into thin half moons
    Salt and Pepper
    1 head cauliflower, core and stem removed, chopped into florets
    1 cup water
    ¼ cup freshly-grated Parmesan cheese, divided
    3 Tbs chopped chives, divided

    Directions
    1. Heat oil in medium saucepan over medium-high heat. Add leeks and sauté ~2 minutes. Season with salt and pepper, and sauté another 1-2 minutes.
    2. Add cauliflower and toss to combine. Season again with salt and pepper and cook, stirring gently, until cauliflower ends begin to brown (~3-4 minutes).
    3. Add water. Cover saucepan and let vegetables steam until soft, ~7 minutes. Stir halfway through.
    4. Remove pan from heat. Using immersion blender*, puree vegetables. Stir in 3 Tbs Parmesan cheese and 2 Tbs chopped chives. Season again with salt and pepper if needed.
    5.  Serve warm with remaining cheese and chives sprinkled over top. 
    *If you don't have an immersion blender, use a handheld, manual vegetable masher. The end product will be lumpier, but still delicious! 

    Thursday, October 3, 2013

    Jalapeno & Green Onion Cornbread

    I was recently inspired by a college friend's deliciously healthy rendition of Southern cornbread. In this version, I added some smokey spice, using a jalapeno mixed into the batter and chipotle butter spread. These grainy muffins were excellent alongside Burning 'Bocha Chili (black bean chili made with Golden Road Beer--recipe coming soon!).

    The Nutrition Rundown: Made with all whole grains and made without butter and sugar, these pack more filling-fiber, fewer calories, and less saturated fat than standard cornbread. It gives you some room to add the delicious buttery spread!


    Jalapeño and Green Onion Cornbread with Chipotle Butter
    Makes 12 muffins

    Ingredients for Cornbread
    1/3 cup safflower oil (or other plant-based oil)
    1 Tablespoon maple syrup
    1 Tablespoon molasses
    2 cups buttermilk (or make it vegan using 2 cups unsweetened almond milk + 2 teaspoons white wine vinegar)
    2 cups cornmeal
    1 cup whole wheat flour
    2 tsp baking powder
    1 teaspoon salt
    1 jalapeño pepper, minced (~3 Tbs minced)
    4 pieces of green onion (tops and bulbs), sliced (~1/4 cup sliced)

    Directions for Cornbread:
    Nutrition Facts based on vegan recipe,
    without butter
    1. Preheat oven to 350 degrees. Using butter or oil, grease 12 muffin tin and set aside.
    2.  In medium bowl, whisk together oil, maple syrup, molasses, and milk.
    3. Sift cornmeal, flour, baking powder, and salt into large bowl.
    4.  Make well in center of dry ingredients and pour in wet ingredients. Stir until just combined. Add jalapeno and green onion and stir to combine.
    5. Pour batter into greased muffin tins. Bake for ~15-20 minutes, until knife inserted in center of muffin comes out clean. Remove from pan and cool on wire racks. Serve warm or room temperature with Chipotle Butter. 
    Cornbread is best served fresh. It can also be stored in closed container at room temperature for up to 48 hours.

    Ingredients for Butter
    ½ cup (1 stick) Unsalted butter, softened to room temperature
    3 chilis from canned chipotles in adobo, finely chopped

    Directions for Butter
    1.  In electric mixer fitted with whisk attachment, whisk butter ~1 minute. Add chilis and mix until well combined, ~1 minute more. (If you don’t have an electric mixer, clean hands work really well for this!)
    2.  Place butter on parchment paper, and roll into log, ~2” in diameter. Allow to chill 30 minutes in refrigerator and slice to serve. (You may also forego step 2, and serve butter whipped at room temperature).

    Butter can be stored in tightly-wrapped parchment in refrigerator up to a month.

    Sunday, September 29, 2013

    Pumpkin Apple Spiced Oatmeal

    Pumpkin and apple are a delicious and tasty autumnal pair. This morning, I made a batch of this hearty oatmeal. It not only made a great weekend breakfast, but it filled the air with the smell of fall! The recipe below serves 4, and whether you're serving 1 or more, I recommend making a hefty batch to re-heat and enjoy all week long. 

    The Nutrition Rundown: A bowl of this well-rounded breakfast treat is full of  beta-carotene (aka vitamin A found in orange fruits and vegetables), and it boasts plenty of cholesterol-lowering, satisfying soluble fiber from apples, pumpkin, and oats. 


    Pumpkin Apple Oatmeal
    Serves 4

    Ingredients
    3 cups water
    1 ½ cups rolled oats (or use steel cut and increase cooking time)
    ½ cup cooked or canned pumpkin puree
    1 apple, chopped
    ¼ cup unsweetened apple sauce
    1 Tbs cinnamon
    2 tsp ginger
    1 tsp cloves
    ½ tsp nutmeg
    1/3 cup raw almonds, chopped
    ¼ cup raisins
    Honey (optional)

    Direction
    1. Bring water to a boil. Add oats and reduce heat to medium. Cook, stirring frequently, ~5 minutes or until oatmeal begins to thicken.
    2. Add pumpkin, apple slices, applesauce and spices. Turn heat to low and simmer another 10 minutes, stirring often.
    3. When oats are desired consistency and apples begin to soften, remove from heat. Stir in almonds and raisins.
    4. Nutrition Facts without added honey
    5. Serve warm as is or drizzled with honey. 

      Tuesday, September 24, 2013

      Homemade Pasta

      My husband and I recently invested in this pasta maker. We decided to go with a hand-crank instead of the automatic version after getting some tips that the hand-crank works just as easily and the automatic can overheat after a small amount of pasta. So far, the hand-crank seems to be a worthy investment in both pasta making and arm workout.

      For a first pasta attempt, we made basic spaghetti using the recipe from one of my favorite cookbooks.  It cooked in about 2 minutes in boiling water and was perfectly al dente. Our crank skills improved dramatically by the end of the process, so next time I'm looking forward to to trying out a new dough recipe.